Showing posts with label side dish. Show all posts

Friday, November 4, 2011

Cornmeal Biscuits

Hi again. I know it's been a while.  Can I blame my lack of posting on my slow-as-cold-tar computer?  Hopefully sometime I'll get a new one and therefore be more willing to upload and edit pictures so I can keep sharing awesome recipes. I made this one yesterday and felt compelled to share.  


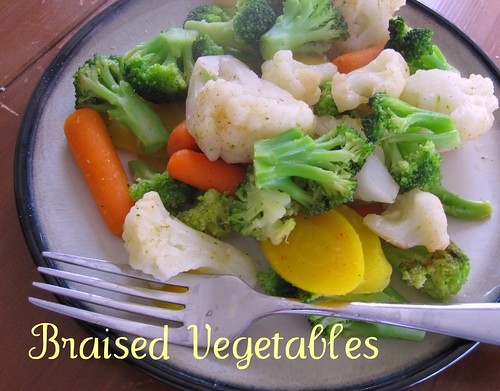
*Chef's Note: I have a great love for all things America's Test Kitchen because of their awesome recipes backed by science.  This makes me happy on so many levels: my foodie, my science geek, and my perfectionist--this food comes out good every single time. This recipe comes from Cook's Country, a cooking show made and hosted by the ATK people but has a more home-style feel to the food they create. This was my first foray into making biscuits at home and I feel like it went well, but I know I can get better results with more practice. These biscuits are hearty enough to be dunked in soups (they are seriously awesome in chicken broth-based soups) and rather exquisite when slathered with honey butter.*
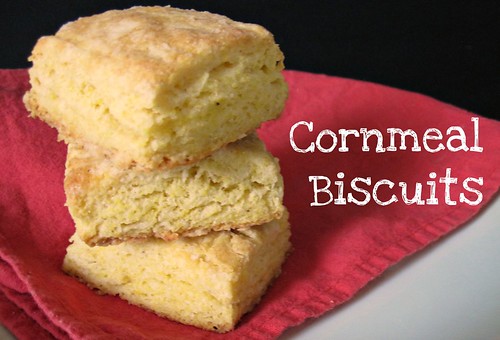

Cornmeal Biscuits

Cornmeal Biscuits 
from Cook's Country

Prep: 20 minutes
Cook: 15 minutes
Makes: 12 2 1/2" round biscuits or 16 2x2 1/2" square biscuits

Ingredients

1 C cornmeal (the finely ground stuff, not the larger-grained stuff you use to make polenta)
1 1/4 C buttermilk
1 tsp honey

2 C all purpose flour
1 tablespoon baking powder (yes, that seems kind of high, but trust me here)
1/2 teaspoon baking soda
1 teaspoon salt
1 1/2 sticks (3/4 C) cold unsalted butter cut into 1/2 inch cubes

Directions

Preheat oven to 450 degrees.

In a medium bowl, whisk together the cornmeal, buttermilk, and honey and let it sit for 10 minutes.

In a large bowl or the bowl of a food processor, blend together the flour, baking powder, baking soda, and salt.  Cut in the butter cubes until the mixture resembles course meal.

Combine the buttermilk mixture and the flour mixture and fold together until just combined and there's no remaining flour. Do not overwork the dough--it will be quite shaggy and not hold together very well.

Lightly flour your board and knead the dough a few times.  Pat it into a 9" circle that measures about 3/4" thick.  Using a 2 1/2" biscuit cutter, cut out biscuits, flouring your cutter between each cut. Pat out your dough scraps and cut out remaining biscuits. (If you have no biscuit cutter like me, pat your dough into an 8"x10" square and mark it into 16 squares.  Use a bench scraper or a knife to cut out the biscuits.)

Place the biscuits on a parchment paper-lined tray.  Bake at 450 for 5 minutes until the biscuits start to rise, then turn the oven temperature down to 400 and bake for 8-12 minutes until golden brown and risen.  (If your oven is obtuse like mine, you may need to rotate your pan halfway through the baking process to ensure even browning.)

Tips
*If you don't have a food processor or a pastry blender, you can still achieve excellence in butter cutting.  Just freeze your butter and then grate it with the large holes in a box grater.  After mixing in your butter, cut through the flour mixture with two knives until it looks like course meal.
*Really, don't over-work the dough.  The biscuits cut from the middle of the rolled out dough took less of a beating and they rose beautifully, while my outside biscuits suffered more pummeling and didn't rise much.  They still taste great though.
*I freehand my honey butter and this time I went with about 1/2 a stick of butter, 3 tablespoons powdered sugar, and a tablespoon and a half of honey.  Make sure you sample it to make sure it tastes right (such hardship!) and add whatever you deem necessary (cinnamon? vanilla extract? orange zest?).

Monday, April 4, 2011

Quick Tip: Braised Vegetables

Much of my meals rely on a small number of techniques that I use so often I forget they are learned skills. In order to demystify cooking a little further, I'm going to walk through these skills step-by-step. Hopefully these "Quick Tips" will be beneficial and if you have any questions, feel free to ask them in the comments and I'll either answer them there or use that as the subject for another "Quick Tip."

Braised Vegetables 1

*Chef's Note: "Braising is a combination cooking method using both moist and dry heat" (thanks, Wikipedia). Thus braising vegetables combines sauteing (dry heat) while steaming the vegetables in their own juices (moist heat). This is my go-to way to prepare vegetables for dinner. In my 4 years of more serious attempts at cooking I have yet to mess it up. It works amazingly well for frozen veggies and, let's be honest, when I'm putting effort into a main dish I don't often feel like prepping and cooking raw vegetables. Regardless of the vegetable you use, these bad boys go from the freezer to the table in less than 10 minutes. And they're awfully tasty. Even Husband, who feels apathetic toward most cooked vegetables, goes back for seconds. *

Braised Vegetables
A Snozzcumber Soup Original

Prep: 2 minutes
Cook: 8-12 minutes
Makes: as much as you want to make

Ingredients

fresh or frozen vegetables
oil
salt-based seasoning

In a medium skillet, heat the oil on medium heat. The amount of oil obviously depends on how many vegetables you plan on cooking as well as the finish of your skillet; if you're working with a non-stick skillet and have 2 cups of veggies, you'll only need a quarter sized drizzle of oil, but If you're working with a stainless steel skillet, you'll need more. Also remember that frozen vegetables will shrink when cooked, especially smaller ones like corn and green beans.

Braised Vegetables 2

When the oil is hot enough to sizzle when a vegetable is placed in the pan, add the vegetables and sprinkle with your seasoning. I'm a big fan of Lawry's Seasoned Salt with pretty much all vegetables (you can see the paprika bits in the picture) but you can mix it up with some Cajun Seasoning, or a steak rub that has a high salt content. Or you can go the purist route and just add salt and pepper. Stir things around to get everything seasoned and cover with a lid.

Every 3 or 4 minutes give the vegetables a quick stir to keep things cooking evenly. The water in the vegetables should be enough to steam everything through, but if you cook them on too high heat you may need to add a few teaspoons of water if things look dry. Once the vegetables are as done as you'd like, pull them off the heat and serve.

There's no real "right" time when the vegetables are done--it's up to you; Husband and I like our green beans more done that other veggies so they get a few more minutes in the pan. The only way you can botch this is if you drastically over-cook or over-salt your food. And then you're only out a couple bucks worth of food, right?

This is a great way to add vegetables to a meal like meatloaf or a casserole. When that dish has 15 minutes left in the oven, go to work at the stove with your vegetables and you'll have a beautifully choreographed dinner that's done at the same time. It can also piggyback off a skillet previously used for the same meal. I got this technique from my mom who had to cook for a family of 7, so it works for single serving meals as well as hordes of hungry people.

Enjoy!

Wednesday, March 4, 2009

Starving-College-Student "Homemade" Salsa

*Chef's Note: These measurements are an estimate. Each batch of salsa is different for one reason or another--for instance, older onions aren't as potent but older jalapeños are probably able to burn off people's flesh--so you need to work with your ingredients to find out what jives. I suggest having a bag of chips handy to taste test your salsa during its creation.*

Prep: 20 minutes
Makes about 1 quart

2 16 oz cans diced tomatoes (drained if you want thicker salsa, but I never drain mine)
1TBS diced hot jalapeños (makes for a mediumish hot salsa for me but it burns Jenny's nose hairs. This is also a great way to use up the rest of the jalapeños from an earlier recipe.)
2 tsp chopped garlic (Jenny always wants MORE!)
1/2 of a medium onion, chopped finely
1/2 C chopped fresh cilantro
1/2 lime, squeezed (or is it squozen?)
2 tsp sugar
Salt and Pepper to taste (the tomatoes are pretty salty already, definitely add some pepper)
Any other things you feel compelled to put in there like chili powder or cumin or green onions--a lovely touch but unnecessary

Combine everything in a medium sized bowl and mix it up. If you have a blender handy and would like to make the bits a little smaller and give some body to the juice you can pulse it until you're satisfied. I wouldn't puree the whole thing--that turns everything into tomato slush. A hand blender works amazingly well because you can blend it directly in the bowl (I have pledged love to mine over and over and will probably continue to do so). Taste and add more ingredients until you are satisfied with the outcome.

Serve with your mom and tortilla chips, or in anything that requires salsa.