Sunday, May 12, 2013

Buffalo Chicken Rolls

Hello all. I realize that it's been a very long time since I posted––I blame that on college. But I'm done with college now (as in I have a degree, not as in I am mutinying, although I considered that option several times), so I now have time to post all the tasty things I've been making while laboring through that degree. So here's the first installment.

I spent last summer in northeastern PA because my husband had an internship with the Facilities department of a minuscule private college (the entire student body was smaller than my high school). While we were gadding about the Eastern seaboard I was introduced to Buffalo wings and fell in love. More specifically, I was introduced to a local tavern's Hot Wing Rollup, which was basically a calzone the size of my head that was full of chicken, cheesy goodness, and enough buffalo sauce to knock down a horse. It was awesome.

Because you can't get Gin's Hot Wing Rollup out here in the west, I had to find a different way to get my Buffalo fix. This is the end result (loosely based on this recipe).

Buffalo Chicken Rolls

Ingredients

  • 1 recipe Pizza Dough (or you can use your favorite pizza or roll dough or even prepackaged dough)
  • 1 onion, chopped
  • about 4-5 cups cooked and shredded chicken (I used two double D size chicken breasts--trimmed, boiled, and shredded)
  • 3 tablespoons butter
  • 3/4-1 cup Frank's Hot Sauce (I use almost a full cup of sauce, but if you prefer less spicy, go for it)
  • 12 oz cream cheese, softened
  • 1-2 cups shredded cheddar cheese 
  • Ranch or Bleu Cheese dressing for dipping

Instructions


  1. Saute chopped onions in butter over medium heat. Once transparent, add Buffalo Sauce and heat for 5 minutes. Remove from heat and set aside.
  2. Smush the cream cheese around in a bowl to soften it further. Add the sauce mix and stir until combined. Add the chicken and stir until everything is coated.
  3. Preheat oven to 400. Prepare a baking sheet with parchment paper or non-stick spray, or, opt to use a prepared muffin tin. (I used muffin tins)
  4. Divide dough in half. Roll each half into a large rectangle roughly 1/4 inch in thickness.
  5. Spread chicken mixture evenly across each piece of rolled out dough. Sprinkle with shredded cheese. Starting from long side of dough, begin rolling the dough up like a cinnamon roll. Pinch ends when done. Slice into 1 1/2 to 2 inch rolls. Place on the baking sheet or in muffin tins. Bake for 15-18 minutes, or until cheese is bubbling and dough is lightly browned.
  6. Stuff yourself until you can't move from bliss.


Monday, July 9, 2012

Girls Camp Granola

*Chef's Note: Since summer is finally here and my pregnancy is in full swing, I've been needing more snacks in my life. I've made a number of granola recipes in my life but this one stands out head and shoulders above the competition. Last summer when my parents were the head cooks for a girls camp that hosted 400 hungry campers they made this and person after person came up to us to say how much they loved it.  It's not overly sweet and it bakes up a little chewy and keeps really well. This is the kind of snack that I don't feel too bad indulging in because it's so full of great stuff and it's so easy to make! And do yourself a favor--pick out a few of the pecans when this has been out of the oven for just a few minutes and experience the magic that is warm, sweet, cardamom-kissed pecans. They are out of this world!*


Girls Camp Granola

Prep: 15 minutes
Cook: 45 minutes
Makes: one large cookie sheet full, or enough to fill up a gallon ziploc bag


Ingredients

1 1/4 c flour
 3/4 tsp salt
1/2 tsp cinnamon
1/2 tsp ground cardamom

1 1/3 c sweetened coconut - not packed
1/4 c flax seeds
3 1/4 c old fashioned rolled oats
1 cup pecans, broken in half
1 cup raw almonds

1 cup light brown sugar
1/3 cup water
1/2 cup butter
1 tsp vanilla

--optional--
1 cup dried cranberries


Directions

Whisk the flour, salt, cinnamon, and cardamom together in a large mixing bowl.  Add the coconut, flax seeds, rolled oats, pecans, and almonds to the bowl and mix to combine until everything is evenly distributed.

In a small saucepan or a microwave safe bowl combine the brown sugar, water and butter and heat until the sugar is dissolved. Don't let this boil or the granola tends to be crunchier. Take the mixture off the heat and add the vanilla. Pour the mixture over the dry ingredients and stir until everything is evenly coated. Preheat the oven to 300 degrees. Let the mixture stand for 10 minutes.


Spread the mixture on cookie sheet bake at 300 for 45 min, stirring every 15 minutes. Keep an eye on it in the last 15 minute period and take it out if it looks like it's over-browning.  Cool completely on the cookie sheet. Add the cranberries now if desired. Transfer to an airtight container and eat within a week. 


Tips:
*You can use half white flour and half wheat flour and there's no flavor difference. It may be possible to only use wheat flour successfully, but I haven't tried that yet. 
*If you don't have cardamom, it's available in bulk (read: you can buy a teaspoon at a time without paying an arm and a leg for a little bottle) at places like Sprouts or Whole Foods. It's not absolutely necessary, but it adds a unique citrusy flavor that cinnamon alone can't touch. If you really don't want to buy cardamom, just add 1/4 teaspoon more cinnamon. 
*As with any recipe for granola, this can be customized for any palate, just make sure you keep the right amount of stuff. If you don't like almonds, try substituting another nut. If you don't have flax seeds you can probably leave them out completely, but they're a great source of omega-3's that we keep hearing about. 
*You can use canola or vegetable oil (or maybe even coconut oil) instead of the butter  but the texture will be slightly different, and I'll be honest--this stuff is phenomenal when made with butter. 
*The granola doesn't really look very cooked when it's done (it hardly browns at all) but it hardens a bit when it cools. If you like your granola crunchy, let it cook until it turns golden brown, otherwise just take it out when the time is up and it should be slightly chewy.
*This stuff keeps really well in the freezer, so if you don't plan on eating it within a week, store it in a freezer safe container and it should stay good for a month or two.

Thursday, March 1, 2012

Spaghetti & Meatball Soup

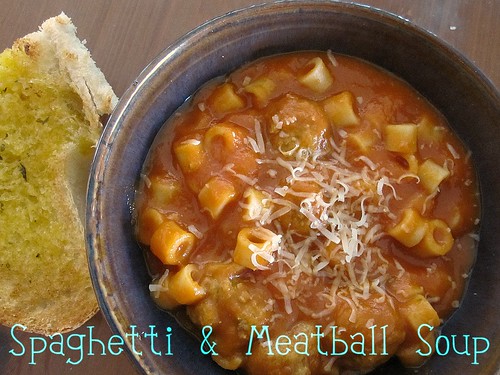
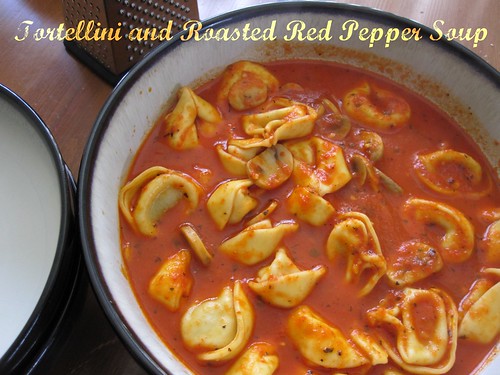
*Chef's Note: The weather around these parts has gone from 70 degree days reminiscent of summer to barely over 50 degrees and overcast. In order to combat this late-winter bout of dreariness I turned to cooking soup. At this point in the season I've cooked through all my favorite recipes and was getting tired of the old standbys.  I wanted something hearty but healthy, and uncomplicated in palate. So I went back to a recipe I had marked in my America's Test Kitchen Light and Healthy 2011 cookbook. It covered all the basics and I even had 90% of the ingredients on hand. A quick trip to the store for some ground turkey and I was golden. Now, I've had some REALLY bad luck with tomato soups in the past (and the Husband is not a big tomato soup fan unless it surrounds spaghetti-o's) so I was hesitant to forge ahead and make my own tomato soup base, but I'm awfully glad I did. This came out brilliantly--creamy and rich with very little fat and all the flavors I associate with comfort food. Even the husband dubbed it "really good" and said it was reminiscent of beef-a-roni in the best way possible.  It was a one pot meal that dirtied one cutting board , one glass bowl, and one immersion blender; something this good and this tidy automatically lands itself on the rotation for as long as the weather stays chilly.*

Spaghetti and Meatball Soup

Spaghetti & Meatball Soup (a.k.a. Tomato Soup with Meatballs and Pasta)
from America's Test Kitchen Light & Healthy 2011 cookbook (with parenthetical notes by Elise)

Prep: 10 minutes
Cook: 40 minutes
Makes: 4 servings

You can use any small, bite-size pasta in this recipe: pasta alphabets are fun if you can find them. Do not use ground chicken breast here--also labeled 99% fat-free--or the meatballs will be dry and grainy. You can make your own pesto, or use your favorite store-bought variety. Serve with a light sprinkling of grated Parmesan cheese, if desired.  If you are concerned about sodium intake, substituted low-sodium diced tomatoes. 


6 ounces ground chicken (I used 93% lean ground turkey since it was on sale and I've had great success with it in the past)
3 tablespoons pesto
3 tablespoons plain bread crumbs
salt and pepper
1 onion, minced (about 1 cup)
1 carrot, peeled and chopped medium
1 small celery rib, chopped medium
1 tablespoon olive oil
3 garlic cloves, minced
2 1/2 cups low-sodium chicken broth
1 (28-ounce) can diced tomatoes
4 ounces ditalini pasta (about 3/4 cup)

1. Combine the onion, carrot, celery, oil and 1/4 teaspoon salt in a large Dutch oven (I used a 4 quart saucepan and it worked out beautifully).  Cover and cook over medium-low heat, stirring occasionally, until the vegetables are softened, 8 to 10 minutes.  Stir in the garlic and cook until fragrant, about 30 seconds. Stir in the broth and tomatoes with their juice. Bring to a simmer, reduce the heat to medium-low, cover, and cook until the carrot is softened, 15 to 20 minutes.
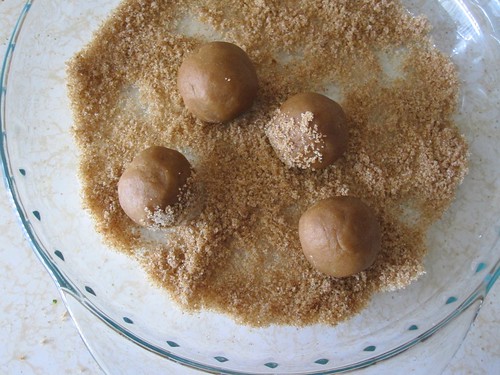
2. While the vegetables are simmering, mix the chicken (or turkey), pesto, bread crumbs, 1/8 teaspoon salt, and a pinch pepper together in a bowl and combine the mixture with your hands until it is uniform. Scoop heaping teaspoonfuls and gently form into 3/4-inch round meatballs--you should have about 30 meatballs.  (This is where I broke out my small oxo cookie scoop--it's 1 1/2 teaspoons, so I only filled it 2/3 of the way full. Cookie scoops are not just for cookies!) Refrigerate until ready to use.
3. Working in 2 batches, process the soup in a blender until completely smooth, 2 to 3 minutes. Return the soup to the pot and bring to a simmer. (Or if you have an immersion blender, take the pot off the stove and blend for the same time directly in the pot.)
4. Stir the meatballs and pasta into the pot and cook until the pasta is al dente and the meatballs are cooked through, 12 to 15 minutes. (This should be done gently, as we don't want the meatballs falling apart.) Season with salt and pepper to taste and serve.

Tips:
* (This one from the book) To prevent getting sprayed or burned by an exploding blender top, fill the blender jar only two-thirds full, hold the lid in place with a folded kitchen towel, and pulse rapidly a couple of times before blending continuously.
* I know blending the soup for 2-3 minutes seems long, but this step is mandatory if you want that creamy tomato soup texture we're after.
* After you add the noodles, scrape the bottom of the pot every couple of minutes since the pasta will stick somethin' fierce. Also, al dente is key here since the pasta will continue to cook even after the soup is off the heat and you don't want to end up with sogged-out pastas.
*This keeps well in the fridge and reheats nicely. I'm sure it could easily be doubled.
*To make this into a really quick weeknight meal, prepare the tomato soup base by following steps 1 and 3 and freeze that. Then when you'r ready to make the rest of your soup, defrost the base, make your meatballs and stir them and the pasta into the simmering soup and cook as directed. You could even make double the amount of soup base one night, finish half for dinner and freeze the other half.  You would be using the same amount of dishes and have twice the meals!

Monday, February 27, 2012

Brown Sugar Cookies

*Chef's Note: I've stated before my love for all things America's Test Kitchen and that love has not yet waned, nor will it in the foreseeable future.  I've made amazing main courses and sides from their recipes but continue to find that their desserts are where they really shine.  So it is with these cookies. I have never been a huge fan of sugar cookies; more often than not they're too hard, chalky, and taste one-dimensional.  However these cookies are the antithesis of one-dimensional--they begin with browned butter and further their deep flavor with dark brown sugar.  I know these aren't terribly attractive, but in my humble estimation their taste more than makes up for their homeliness. They taste like toffee in a rich, chewy, dense, overwhelmingly decadent cookie. If you're looking for something slightly more challenging than your regular chocolate chip cookie, this is your dessert. And it doesn't require (or even benefit from) a stand mixer. So score one more for less dishes!*

2012-2 006

Brown Sugar Cookies
from America's Test Kitchen (with parenthetical notes by Elise)

Prep: 25 minutes
Cook: 12-14 minutes
Makes: 2 dozen cookies

The most efficient way to bake these cookies is to portion and bake half of the dough. While the first batch is in the oven, the remaining dough can be prepared for baking. Avoid using a nonstick skillet to brown the butter. The dark color of the nonstick coating makes it difficult to gauge when the butter is sufficiently browned. (Or be like me and use your non-stick skillet because you don't have anyting else but check the color compulsively against your white spatula you use to stir.) Use fresh brown sugar, as older (read: harder and drier) brown sugar will make the cookies too dry.

14 tablespoons unsalted butter (1 3/4 sticks)
1/4 cup granulated sugar (about 1 3/4 ounces)
2cups packed dark brown sugar (14 ounces)
2 cups unbleached all-purpose flour plus 2 tablespoons (about 10 1/2 ounces)
1/2 teaspoon baking soda
1/4 teaspoon baking powder
1/2 teaspoon table salt
1 large egg
1 large egg yolk
1 tablespoon vanilla extract (seriously, a tablespoon--and the better quality your vanilla, the better the cookies will taste)


1. Heat 10 tablespoons butter in 10-inch skillet over medium-high heat until melted, about 2 minutes. Continue to cook, swirling pan constantly until butter is dark golden brown and has nutty aroma, 1 to 3 minutes. Remove skillet from heat and transfer browned butter to large heatproof bowl. Stir remaining 4 tablespoons butter into hot butter to melt; set aside for 15 minutes.

2. Meanwhile, adjust oven rack to middle position and heat oven to 350 degrees. Line 2 large (18 by 12-inch) baking sheets with parchment paper. In shallow baking dish or pie plate, mix granulated sugar and 1/4 cup packed brown sugar, rubbing between fingers, until well combined; set aside. Whisk flour, baking soda, and baking powder together in medium bowl; set aside.

3. Add remaining 1 3/4 cups brown sugar and salt to bowl with cooled butter; mix until no sugar lumps remain, about 30 seconds. Scrape down sides of bowl with rubber spatula; add egg, yolk, and vanilla and mix until fully incorporated, about 30 seconds. Scrape down bowl. Add flour mixture and mix until just combined, about 1 minute. Give dough final stir with rubber spatula to ensure that no flour pockets remain and ingredients are evenly distributed.

4. Divide dough into 24 portions, each about 2 tablespoons, rolling between hands into balls about 1 1/2 inches in diameter. Working in batches, toss balls in reserved sugar mixture to coat and set on prepared baking sheet, spacing them about 2 inches apart, 12 dough balls per sheet. (Smaller baking sheets can be used, but it will take 3 batches.)

5. Bake one sheet at a time until cookies are browned and still puffy and edges have begun to set but centers are still soft (cookies will look raw between cracks and seem underdone, 12 to 14 minutes, rotating baking sheet halfway through baking. Do not overbake.

6. Cool cookies on baking sheet 5 minutes; using wide metal spatula, transfer cookies to wire rack and cool to room temperature.


Tips:
*When browning your butter, feel free to take your time and keep the heat lower if you're afraid of burning it. You will know you've arrived when it starts to smell like toffee (you'll know when this is--it's rich and amazing and you'll just want to stand there and inhale and inhale and inhale) and the milk solids are brown. Err on the side of under browning if you're anxious about charring your butter like I am. Also, once it's a deep golden brown, get it out of the skillet and into your bowl so it stops cooking.

2012-2 003*As much as I love daintily sized cookies, these need to be large to keep the outsides crisp and the insides chewy, so don't go any smaller with your dough balls than 1 1/2 tablespoons (the size of a medium Oxo cookie scoop--the ones in the picture are a heaping medium cookie scoop). If you don't have a cookie scoop, I would recommend using a tablespoon measure to scoop out the dough to keep the cookies the same size, since size is key to making evenly cooked cookies.


2012-2 009
2012-2 002
*When judging doneness, poke the very outside edge of the cookie and if it feels slightly crispy while the middle feels very soft, you're good. My oven bakes oddly and so my cookies didn't get any cracks in them. This phenomenon happens pretty consistently and, although my cookies look like wrinkly bulldog puppies, they sure taste good.

*Because these cookies are so dark to begin with, it's hard to gauge doneness by color. Unfortunately you just have to learn what works for your oven by trial and error. I found my cookies cooked much more evenly when I rotated my baking sheet half way through.

Thursday, November 17, 2011

No Sugar Oat Drops

*Chef's Note: I have tried to find a recipe for some sort of homemade granola bar for years now without much success.  I finally found this recipe (thanks to Pinterest) and scoffed at it initially; how could it even taste good? It's like a cookie but without sugar and HOW CAN YOU LIKE A COOKIE WITHOUT SUGAR?!? But then the more I thought about it, the more I realized I needed to give it a try. And boy howdy did it turn out well!  This particular snack is full of all sorts of protein thanks to the nuts, terribly high in fiber (from the oats, dried fruit, and nuts), high in those "healthy fats" they keep talking about, and just a little bit sweet because of the bananas and the fruit.  These are really filling for how small they are and freeze well; this makes them perfect for taking in lunches and grabbing when you're headed out the door and are trying to stave off that dreaded blood-sugar plummet I've come to know so well.  These also happen to be vegan and gluten free. And they make your house smell amazing when they bake. And they take just as long to make as a batch of cookies. Are you sold yet?*


2011-11 067

No Sugar Oat Drops
adapted from Blueberry Girl


Prep: 20 minutes
Cook: 20minutes
Makes: 18 cookies


1 1/2 cups old fashioned rolled oats
1 cup coconut flakes (I used the kind you can find in the baking aisle but if you really wanted to go super healthy you could get unsweetened flakes at a whole foods store)
1/2 teaspoon salt 
1 teaspoon cinnamon
1/2 teaspoon allspice (I didn't have any, so I used 1/8 tsp cardamom and 1/4 tsp nutmeg)
1/4 cup of almond meal or flax meal*
1/2 cup mixed nuts, finely chopped (I used almonds and walnuts)
1 cup dried fruit (I used 1/2 dried cranberries, and 1/2 raisins)


3 ripe bananas, mashed (the browner the banana, the sweeter it becomes)
1/4 cup canola oil
1 teaspoon vanilla extract


Preheat oven to 350 F. Line baking sheet with parchment paper. 
In a large bowl, combine oats, almond/flax meal, mixed nuts and coconut . Stir in spices and salt. Add dried fruit and mix well, making sure the fruit doesn't clump.


In a smaller bowl (or a blender, if you're like me and cannot stand chunks of banana) combine canola oil, mashed banana and vanilla extract. Pour wet ingredients over dry ingredients and stir until well combined. 


Using measuring cup, scoop up a scant 1/4 cup of dough and drop it on the cookie sheet. Press the dough together with your hands into a flat-ish cylinder, or pack the dough into a round cookie cutter to form. Because these cookies don't spread when baking they only need to be an inch or so apart. 


Bake for 20 minutes until edges are golden brown, rotating the pan halfway through baking.


oat drops


Tips:
*If you don't want to buy almond meal or flax meal, blend 1/4 cup of almonds or flax seeds with 1 teaspoon of flour or cornstarch until the mixture looks like cornmeal (the flour or cornstarch will absorb the oil that comes from the ground up almonds or flax). If it starts clumping, stop processing otherwise you'll end up with almond butter or whatever flax seeds turn into when it's pureed. You'll want to use cornstarch to keep this gluten-free. 
*This recipe is not hard and fast--explore using different nuts or fruits or less fruit or maybe add a bit of molasses to the banana mixture. Just remember to keep the proportions the same, so if you take away the  nuts entirely, add that much more rolled oats to keep things in balance. Likewise, if you're short a banana but you have applesauce, try the substitution. 

Friday, November 4, 2011

Cornmeal Biscuits

Hi again. I know it's been a while.  Can I blame my lack of posting on my slow-as-cold-tar computer?  Hopefully sometime I'll get a new one and therefore be more willing to upload and edit pictures so I can keep sharing awesome recipes. I made this one yesterday and felt compelled to share.  


*Chef's Note: I have a great love for all things America's Test Kitchen because of their awesome recipes backed by science.  This makes me happy on so many levels: my foodie, my science geek, and my perfectionist--this food comes out good every single time. This recipe comes from Cook's Country, a cooking show made and hosted by the ATK people but has a more home-style feel to the food they create. This was my first foray into making biscuits at home and I feel like it went well, but I know I can get better results with more practice. These biscuits are hearty enough to be dunked in soups (they are seriously awesome in chicken broth-based soups) and rather exquisite when slathered with honey butter.*


Cornmeal Biscuits

Cornmeal Biscuits 
from Cook's Country

Prep: 20 minutes
Cook: 15 minutes
Makes: 12 2 1/2" round biscuits or 16 2x2 1/2" square biscuits

Ingredients

1 C cornmeal (the finely ground stuff, not the larger-grained stuff you use to make polenta)
1 1/4 C buttermilk
1 tsp honey

2 C all purpose flour
1 tablespoon baking powder (yes, that seems kind of high, but trust me here)
1/2 teaspoon baking soda
1 teaspoon salt
1 1/2 sticks (3/4 C) cold unsalted butter cut into 1/2 inch cubes

Directions

Preheat oven to 450 degrees.

In a medium bowl, whisk together the cornmeal, buttermilk, and honey and let it sit for 10 minutes.

In a large bowl or the bowl of a food processor, blend together the flour, baking powder, baking soda, and salt.  Cut in the butter cubes until the mixture resembles course meal.

Combine the buttermilk mixture and the flour mixture and fold together until just combined and there's no remaining flour. Do not overwork the dough--it will be quite shaggy and not hold together very well.

Lightly flour your board and knead the dough a few times.  Pat it into a 9" circle that measures about 3/4" thick.  Using a 2 1/2" biscuit cutter, cut out biscuits, flouring your cutter between each cut. Pat out your dough scraps and cut out remaining biscuits. (If you have no biscuit cutter like me, pat your dough into an 8"x10" square and mark it into 16 squares.  Use a bench scraper or a knife to cut out the biscuits.)

Place the biscuits on a parchment paper-lined tray.  Bake at 450 for 5 minutes until the biscuits start to rise, then turn the oven temperature down to 400 and bake for 8-12 minutes until golden brown and risen.  (If your oven is obtuse like mine, you may need to rotate your pan halfway through the baking process to ensure even browning.)

Tips
*If you don't have a food processor or a pastry blender, you can still achieve excellence in butter cutting.  Just freeze your butter and then grate it with the large holes in a box grater.  After mixing in your butter, cut through the flour mixture with two knives until it looks like course meal.
*Really, don't over-work the dough.  The biscuits cut from the middle of the rolled out dough took less of a beating and they rose beautifully, while my outside biscuits suffered more pummeling and didn't rise much.  They still taste great though.
*I freehand my honey butter and this time I went with about 1/2 a stick of butter, 3 tablespoons powdered sugar, and a tablespoon and a half of honey.  Make sure you sample it to make sure it tastes right (such hardship!) and add whatever you deem necessary (cinnamon? vanilla extract? orange zest?).

Monday, April 4, 2011

Quick Tip: Braised Vegetables

Much of my meals rely on a small number of techniques that I use so often I forget they are learned skills. In order to demystify cooking a little further, I'm going to walk through these skills step-by-step. Hopefully these "Quick Tips" will be beneficial and if you have any questions, feel free to ask them in the comments and I'll either answer them there or use that as the subject for another "Quick Tip."

Braised Vegetables 1

*Chef's Note: "Braising is a combination cooking method using both moist and dry heat" (thanks, Wikipedia). Thus braising vegetables combines sauteing (dry heat) while steaming the vegetables in their own juices (moist heat). This is my go-to way to prepare vegetables for dinner. In my 4 years of more serious attempts at cooking I have yet to mess it up. It works amazingly well for frozen veggies and, let's be honest, when I'm putting effort into a main dish I don't often feel like prepping and cooking raw vegetables. Regardless of the vegetable you use, these bad boys go from the freezer to the table in less than 10 minutes. And they're awfully tasty. Even Husband, who feels apathetic toward most cooked vegetables, goes back for seconds. *

Braised Vegetables
A Snozzcumber Soup Original

Prep: 2 minutes
Cook: 8-12 minutes
Makes: as much as you want to make

Ingredients

fresh or frozen vegetables
oil
salt-based seasoning

In a medium skillet, heat the oil on medium heat. The amount of oil obviously depends on how many vegetables you plan on cooking as well as the finish of your skillet; if you're working with a non-stick skillet and have 2 cups of veggies, you'll only need a quarter sized drizzle of oil, but If you're working with a stainless steel skillet, you'll need more. Also remember that frozen vegetables will shrink when cooked, especially smaller ones like corn and green beans.

Braised Vegetables 2

When the oil is hot enough to sizzle when a vegetable is placed in the pan, add the vegetables and sprinkle with your seasoning. I'm a big fan of Lawry's Seasoned Salt with pretty much all vegetables (you can see the paprika bits in the picture) but you can mix it up with some Cajun Seasoning, or a steak rub that has a high salt content. Or you can go the purist route and just add salt and pepper. Stir things around to get everything seasoned and cover with a lid.

Every 3 or 4 minutes give the vegetables a quick stir to keep things cooking evenly. The water in the vegetables should be enough to steam everything through, but if you cook them on too high heat you may need to add a few teaspoons of water if things look dry. Once the vegetables are as done as you'd like, pull them off the heat and serve.

There's no real "right" time when the vegetables are done--it's up to you; Husband and I like our green beans more done that other veggies so they get a few more minutes in the pan. The only way you can botch this is if you drastically over-cook or over-salt your food. And then you're only out a couple bucks worth of food, right?

This is a great way to add vegetables to a meal like meatloaf or a casserole. When that dish has 15 minutes left in the oven, go to work at the stove with your vegetables and you'll have a beautifully choreographed dinner that's done at the same time. It can also piggyback off a skillet previously used for the same meal. I got this technique from my mom who had to cook for a family of 7, so it works for single serving meals as well as hordes of hungry people.

Enjoy!

Friday, March 18, 2011

Tortellini and Roasted Red Pepper Soup

 by Snozzcumber Soup

*Chef's Note: This recipe was sent to me by a long-time friend and blog reader, Mitchell. I know his dad is a foodie and must have passed that love of food onto Mitchell, because this soup was great. It's simple, albeit a little expensive, and would be perfect for a night of entertaining where you want something fancy but no-fuss; it goes beyond regular noodles-and-tomato-sauce without being too weird for the less adventurous eater.*

Tortellini and Roasted Red Pepper Soup
[slightly] Adapted from Mitchell's recipe

Prep: 10 minutes
Cook: 15 minutes
Makes: 6 main dish servings

Ingredients

8 oz white mushrooms
2 cloves garlic, diced
1 TBS olive oil (or butter)
2 (16 oz) jars roasted red peppers (found in the salad dressing aisle)
2 (14.5 oz) cans chicken broth
1 tsp dried basil
1 tsp dried oregano
1/2 tsp salt
1/2 tsp ground black pepper
2 (9 oz) packages fresh cheese tortellini, uncooked

Directions

Place the roasted red peppers and liquid in a blender or food processor, and blend until smooth.

Heat olive oil in large saucepan. Chop mushrooms and, once the oil is hot, add mushrooms to the pan and cook for 5 minutes or until the mushrooms begin to brown. Add the garlic and cook one minute.

Stir in the pureed red peppers, chicken broth, and seasonings. (It will look really runny but it will thicken substantially as it cooks.) Bring the mixture to a boil. Add the tortellini and continue cooking, uncovered, on medium high-heat for 8-10 minutes, or until pasta is al dente.

Tips
*This can easily be made into a sauce instead of a soup by using less of the chicken broth (half? maybe more?) and cooking the pasta in a separate pot of water. You would still need to cook the sauce for 8-10 minutes to allow it to thicken.
*To cut down on costs, this could be made with canned roasted tomatoes--the roasting would give it more depth than a regular tomato soup.
*Try browning some diced onions and adding a TBS or so of white cooking wine before cooking the mushrooms--this would give the dish a hint of sweetness and balance the boldness of the red peppers.
*Stick with the cheese tortellini. The soup doesn't leave you a lot of room to taste a more complex flavored pasta.

Monday, March 7, 2011

Sweet French Dressing

*Chef's Note: I recently jumped into the world of eating lots of fruits and vegetables (you know about that whole food pyramid thing? Genius!). One thing that smoothed my transitions from a few veggies to a lot of veggies was this dressing. I could eat a whole raw cucumber dipped in this shockingly bright orange sauce and be a happy happy girl. It's particularly tasty on slightly bitter veggies like spinach and cucumbers rather than sweeter, milder ones like carrots.*

2011-03 051 by Snozzcumber Soup


Sweet French Dressing (a.k.a. Nikki Sauce)
from my little sister's friend Nikki

3/4 C sugar
1 tsp salt
1 TBS Worcestershire Sauce
1/4 C ketchup
1/3 C apple cider vinegar
1 scant C vegetable oil (NOT Canola oil)
1 tsp grated or finely chopped onion (of if you're lazy, 1/2 tsp onion powder)

Combine ingredients in blender and blend for about 60 seconds. The dressing will be the color of a bandaid (no kidding), but as it sits it will deepen to a bright orange.

Tips:
*The oil shouldn't separate, but if it does, blend until it emulsifies.
*If you like a more acidic dressing, only add 1/2 C of sugar
*I make this in a pint sized wide-mouth Mason jar with my hand blender--it stores nicely in that same container and makes very little mess.
*This recipe halves well (especially if it's feeding two people) and keeps in the fridge for about 2 weeks.

Friday, March 4, 2011

And so the blog grinds back to life...

After almost exactly two years of being derelict, I'm attempting to get things back up and running. Husband has a new job (we're no longer college students!! We can buy expensive produce and not feel guilty!!!) and I have more time to myself than I probably should, so I'm going to do my best to document the good meals that come out of my kitchen (because we all know how badly dinner can flop--I'm looking at you, Velveeta cheese!).

I've had a talk with myself and decided to not aim obscenely high regarding my goals of this little blog, and I think I can speak for Jenny too: we want to create a forum to share relatively easy, healthy meals for busy people and some helpful skills we've picked up from our years in the kitchen.

I'm trying to keep my ego in check and not anticipate a huge following; mainly I want to reach my friends who have asked for recipes in the past. And let's be honest here--my photography skillz are lacking and there are much prettier blogs out there to read. A lot of my recipes will come off other blogs, but again, I'm after sharing the good stuff I find (and giving proper credit).

So now that we've had that lovely DTR, let's try this blogging thing again, shall we?