Monday, July 9, 2012

Girls Camp Granola

*Chef's Note: Since summer is finally here and my pregnancy is in full swing, I've been needing more snacks in my life. I've made a number of granola recipes in my life but this one stands out head and shoulders above the competition. Last summer when my parents were the head cooks for a girls camp that hosted 400 hungry campers they made this and person after person came up to us to say how much they loved it.  It's not overly sweet and it bakes up a little chewy and keeps really well. This is the kind of snack that I don't feel too bad indulging in because it's so full of great stuff and it's so easy to make! And do yourself a favor--pick out a few of the pecans when this has been out of the oven for just a few minutes and experience the magic that is warm, sweet, cardamom-kissed pecans. They are out of this world!*


Girls Camp Granola

Prep: 15 minutes
Cook: 45 minutes
Makes: one large cookie sheet full, or enough to fill up a gallon ziploc bag


Ingredients

1 1/4 c flour
 3/4 tsp salt
1/2 tsp cinnamon
1/2 tsp ground cardamom

1 1/3 c sweetened coconut - not packed
1/4 c flax seeds
3 1/4 c old fashioned rolled oats
1 cup pecans, broken in half
1 cup raw almonds

1 cup light brown sugar
1/3 cup water
1/2 cup butter
1 tsp vanilla

--optional--
1 cup dried cranberries


Directions

Whisk the flour, salt, cinnamon, and cardamom together in a large mixing bowl.  Add the coconut, flax seeds, rolled oats, pecans, and almonds to the bowl and mix to combine until everything is evenly distributed.

In a small saucepan or a microwave safe bowl combine the brown sugar, water and butter and heat until the sugar is dissolved. Don't let this boil or the granola tends to be crunchier. Take the mixture off the heat and add the vanilla. Pour the mixture over the dry ingredients and stir until everything is evenly coated. Preheat the oven to 300 degrees. Let the mixture stand for 10 minutes.


Spread the mixture on cookie sheet bake at 300 for 45 min, stirring every 15 minutes. Keep an eye on it in the last 15 minute period and take it out if it looks like it's over-browning.  Cool completely on the cookie sheet. Add the cranberries now if desired. Transfer to an airtight container and eat within a week. 


Tips:
*You can use half white flour and half wheat flour and there's no flavor difference. It may be possible to only use wheat flour successfully, but I haven't tried that yet. 
*If you don't have cardamom, it's available in bulk (read: you can buy a teaspoon at a time without paying an arm and a leg for a little bottle) at places like Sprouts or Whole Foods. It's not absolutely necessary, but it adds a unique citrusy flavor that cinnamon alone can't touch. If you really don't want to buy cardamom, just add 1/4 teaspoon more cinnamon. 
*As with any recipe for granola, this can be customized for any palate, just make sure you keep the right amount of stuff. If you don't like almonds, try substituting another nut. If you don't have flax seeds you can probably leave them out completely, but they're a great source of omega-3's that we keep hearing about. 
*You can use canola or vegetable oil (or maybe even coconut oil) instead of the butter  but the texture will be slightly different, and I'll be honest--this stuff is phenomenal when made with butter. 
*The granola doesn't really look very cooked when it's done (it hardly browns at all) but it hardens a bit when it cools. If you like your granola crunchy, let it cook until it turns golden brown, otherwise just take it out when the time is up and it should be slightly chewy.
*This stuff keeps really well in the freezer, so if you don't plan on eating it within a week, store it in a freezer safe container and it should stay good for a month or two.

Thursday, March 1, 2012

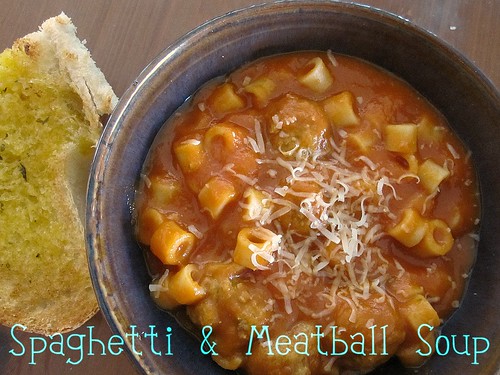
Spaghetti & Meatball Soup

*Chef's Note: The weather around these parts has gone from 70 degree days reminiscent of summer to barely over 50 degrees and overcast. In order to combat this late-winter bout of dreariness I turned to cooking soup. At this point in the season I've cooked through all my favorite recipes and was getting tired of the old standbys.  I wanted something hearty but healthy, and uncomplicated in palate. So I went back to a recipe I had marked in my America's Test Kitchen Light and Healthy 2011 cookbook. It covered all the basics and I even had 90% of the ingredients on hand. A quick trip to the store for some ground turkey and I was golden. Now, I've had some REALLY bad luck with tomato soups in the past (and the Husband is not a big tomato soup fan unless it surrounds spaghetti-o's) so I was hesitant to forge ahead and make my own tomato soup base, but I'm awfully glad I did. This came out brilliantly--creamy and rich with very little fat and all the flavors I associate with comfort food. Even the husband dubbed it "really good" and said it was reminiscent of beef-a-roni in the best way possible.  It was a one pot meal that dirtied one cutting board , one glass bowl, and one immersion blender; something this good and this tidy automatically lands itself on the rotation for as long as the weather stays chilly.*

Spaghetti and Meatball Soup

Spaghetti & Meatball Soup (a.k.a. Tomato Soup with Meatballs and Pasta)
from America's Test Kitchen Light & Healthy 2011 cookbook (with parenthetical notes by Elise)

Prep: 10 minutes
Cook: 40 minutes
Makes: 4 servings

You can use any small, bite-size pasta in this recipe: pasta alphabets are fun if you can find them. Do not use ground chicken breast here--also labeled 99% fat-free--or the meatballs will be dry and grainy. You can make your own pesto, or use your favorite store-bought variety. Serve with a light sprinkling of grated Parmesan cheese, if desired.  If you are concerned about sodium intake, substituted low-sodium diced tomatoes. 


6 ounces ground chicken (I used 93% lean ground turkey since it was on sale and I've had great success with it in the past)
3 tablespoons pesto
3 tablespoons plain bread crumbs
salt and pepper
1 onion, minced (about 1 cup)
1 carrot, peeled and chopped medium
1 small celery rib, chopped medium
1 tablespoon olive oil
3 garlic cloves, minced
2 1/2 cups low-sodium chicken broth
1 (28-ounce) can diced tomatoes
4 ounces ditalini pasta (about 3/4 cup)

1. Combine the onion, carrot, celery, oil and 1/4 teaspoon salt in a large Dutch oven (I used a 4 quart saucepan and it worked out beautifully).  Cover and cook over medium-low heat, stirring occasionally, until the vegetables are softened, 8 to 10 minutes.  Stir in the garlic and cook until fragrant, about 30 seconds. Stir in the broth and tomatoes with their juice. Bring to a simmer, reduce the heat to medium-low, cover, and cook until the carrot is softened, 15 to 20 minutes.
2. While the vegetables are simmering, mix the chicken (or turkey), pesto, bread crumbs, 1/8 teaspoon salt, and a pinch pepper together in a bowl and combine the mixture with your hands until it is uniform. Scoop heaping teaspoonfuls and gently form into 3/4-inch round meatballs--you should have about 30 meatballs.  (This is where I broke out my small oxo cookie scoop--it's 1 1/2 teaspoons, so I only filled it 2/3 of the way full. Cookie scoops are not just for cookies!) Refrigerate until ready to use.
3. Working in 2 batches, process the soup in a blender until completely smooth, 2 to 3 minutes. Return the soup to the pot and bring to a simmer. (Or if you have an immersion blender, take the pot off the stove and blend for the same time directly in the pot.)
4. Stir the meatballs and pasta into the pot and cook until the pasta is al dente and the meatballs are cooked through, 12 to 15 minutes. (This should be done gently, as we don't want the meatballs falling apart.) Season with salt and pepper to taste and serve.

Tips:
* (This one from the book) To prevent getting sprayed or burned by an exploding blender top, fill the blender jar only two-thirds full, hold the lid in place with a folded kitchen towel, and pulse rapidly a couple of times before blending continuously.
* I know blending the soup for 2-3 minutes seems long, but this step is mandatory if you want that creamy tomato soup texture we're after.
* After you add the noodles, scrape the bottom of the pot every couple of minutes since the pasta will stick somethin' fierce. Also, al dente is key here since the pasta will continue to cook even after the soup is off the heat and you don't want to end up with sogged-out pastas.
*This keeps well in the fridge and reheats nicely. I'm sure it could easily be doubled.
*To make this into a really quick weeknight meal, prepare the tomato soup base by following steps 1 and 3 and freeze that. Then when you'r ready to make the rest of your soup, defrost the base, make your meatballs and stir them and the pasta into the simmering soup and cook as directed. You could even make double the amount of soup base one night, finish half for dinner and freeze the other half.  You would be using the same amount of dishes and have twice the meals!

Monday, February 27, 2012

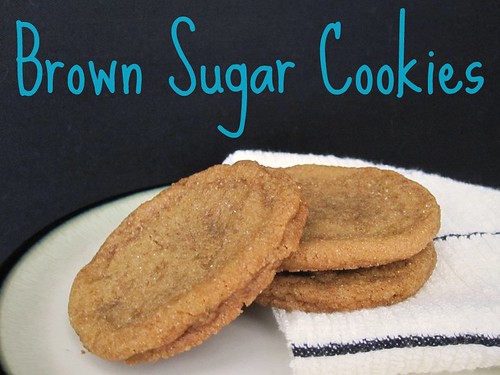
Brown Sugar Cookies

*Chef's Note: I've stated before my love for all things America's Test Kitchen and that love has not yet waned, nor will it in the foreseeable future.  I've made amazing main courses and sides from their recipes but continue to find that their desserts are where they really shine.  So it is with these cookies. I have never been a huge fan of sugar cookies; more often than not they're too hard, chalky, and taste one-dimensional.  However these cookies are the antithesis of one-dimensional--they begin with browned butter and further their deep flavor with dark brown sugar.  I know these aren't terribly attractive, but in my humble estimation their taste more than makes up for their homeliness. They taste like toffee in a rich, chewy, dense, overwhelmingly decadent cookie. If you're looking for something slightly more challenging than your regular chocolate chip cookie, this is your dessert. And it doesn't require (or even benefit from) a stand mixer. So score one more for less dishes!*

2012-2 006

Brown Sugar Cookies
from America's Test Kitchen (with parenthetical notes by Elise)

Prep: 25 minutes
Cook: 12-14 minutes
Makes: 2 dozen cookies

The most efficient way to bake these cookies is to portion and bake half of the dough. While the first batch is in the oven, the remaining dough can be prepared for baking. Avoid using a nonstick skillet to brown the butter. The dark color of the nonstick coating makes it difficult to gauge when the butter is sufficiently browned. (Or be like me and use your non-stick skillet because you don't have anyting else but check the color compulsively against your white spatula you use to stir.) Use fresh brown sugar, as older (read: harder and drier) brown sugar will make the cookies too dry.

14 tablespoons unsalted butter (1 3/4 sticks)
1/4 cup granulated sugar (about 1 3/4 ounces)
2cups packed dark brown sugar (14 ounces)
2 cups unbleached all-purpose flour plus 2 tablespoons (about 10 1/2 ounces)
1/2 teaspoon baking soda
1/4 teaspoon baking powder
1/2 teaspoon table salt
1 large egg
1 large egg yolk
1 tablespoon vanilla extract (seriously, a tablespoon--and the better quality your vanilla, the better the cookies will taste)


1. Heat 10 tablespoons butter in 10-inch skillet over medium-high heat until melted, about 2 minutes. Continue to cook, swirling pan constantly until butter is dark golden brown and has nutty aroma, 1 to 3 minutes. Remove skillet from heat and transfer browned butter to large heatproof bowl. Stir remaining 4 tablespoons butter into hot butter to melt; set aside for 15 minutes.

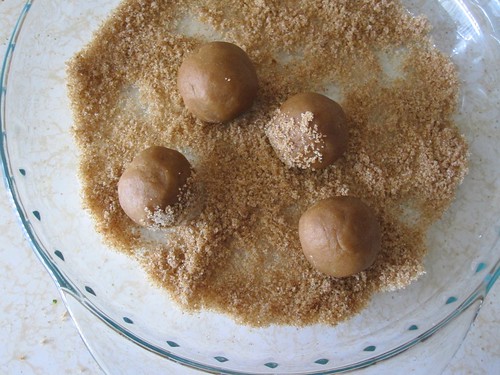
2. Meanwhile, adjust oven rack to middle position and heat oven to 350 degrees. Line 2 large (18 by 12-inch) baking sheets with parchment paper. In shallow baking dish or pie plate, mix granulated sugar and 1/4 cup packed brown sugar, rubbing between fingers, until well combined; set aside. Whisk flour, baking soda, and baking powder together in medium bowl; set aside.

3. Add remaining 1 3/4 cups brown sugar and salt to bowl with cooled butter; mix until no sugar lumps remain, about 30 seconds. Scrape down sides of bowl with rubber spatula; add egg, yolk, and vanilla and mix until fully incorporated, about 30 seconds. Scrape down bowl. Add flour mixture and mix until just combined, about 1 minute. Give dough final stir with rubber spatula to ensure that no flour pockets remain and ingredients are evenly distributed.

4. Divide dough into 24 portions, each about 2 tablespoons, rolling between hands into balls about 1 1/2 inches in diameter. Working in batches, toss balls in reserved sugar mixture to coat and set on prepared baking sheet, spacing them about 2 inches apart, 12 dough balls per sheet. (Smaller baking sheets can be used, but it will take 3 batches.)

5. Bake one sheet at a time until cookies are browned and still puffy and edges have begun to set but centers are still soft (cookies will look raw between cracks and seem underdone, 12 to 14 minutes, rotating baking sheet halfway through baking. Do not overbake.

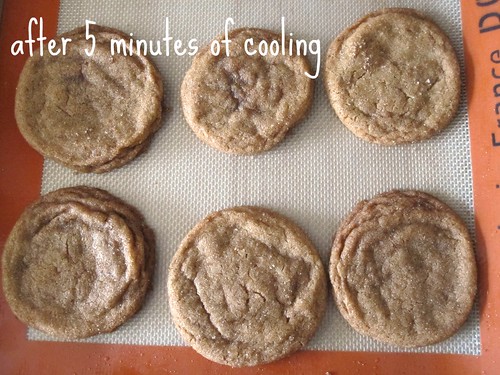
6. Cool cookies on baking sheet 5 minutes; using wide metal spatula, transfer cookies to wire rack and cool to room temperature.


Tips:
*When browning your butter, feel free to take your time and keep the heat lower if you're afraid of burning it. You will know you've arrived when it starts to smell like toffee (you'll know when this is--it's rich and amazing and you'll just want to stand there and inhale and inhale and inhale) and the milk solids are brown. Err on the side of under browning if you're anxious about charring your butter like I am. Also, once it's a deep golden brown, get it out of the skillet and into your bowl so it stops cooking.

2012-2 003*As much as I love daintily sized cookies, these need to be large to keep the outsides crisp and the insides chewy, so don't go any smaller with your dough balls than 1 1/2 tablespoons (the size of a medium Oxo cookie scoop--the ones in the picture are a heaping medium cookie scoop). If you don't have a cookie scoop, I would recommend using a tablespoon measure to scoop out the dough to keep the cookies the same size, since size is key to making evenly cooked cookies.


2012-2 009
2012-2 002
*When judging doneness, poke the very outside edge of the cookie and if it feels slightly crispy while the middle feels very soft, you're good. My oven bakes oddly and so my cookies didn't get any cracks in them. This phenomenon happens pretty consistently and, although my cookies look like wrinkly bulldog puppies, they sure taste good.

*Because these cookies are so dark to begin with, it's hard to gauge doneness by color. Unfortunately you just have to learn what works for your oven by trial and error. I found my cookies cooked much more evenly when I rotated my baking sheet half way through.